
Custom Permission :- By using custom permissions in Salesforce flow, you can grant users access to custom apps. In Salesforce, you can use custom permissions to check which users can access certain functionality. Custom permissions let you define access checks that can be assigned to users via permission sets or profiles – similar to how you assign user permissions and other access settings. You can even use custom permission to bypass the validation rule for certain users or profiles. Let us create custom permission to bypass flows
There are three major Steps in order to Bypass Salesforce flow for Specific user or Specific profile
- Creating a custom permission
- Create and Assign custom permission to the system administrator profile
- Salesforce Flow :-
- Clone existing flow/Create new salesforce flow
- Modify decision element criteria
Step 1 :- Create Custom permission
1 ) :- Click Setup Gear then go to the Quick Find Box,
2 ) :- Search for Custom Permission in Quick find Box
3 ) :- Click on New Button
4 ) :- Enter and Fill the below details in the field values
Lable :- Bypass Account Validation
Name :- Bypass_Account_Validation
Description :- give accordingly
Connected App :- leave blank
click on Save
Step 2 :- Create and Assign custom permission to the system administrator profile
1 ) :- Again go to the Setup Quick find box search for Permission set, click and Open it
2 ) :- Click on new button, and fill the below details
Label :- Custom Permission set
API Name :- Custom_Permission_Set
Description :- Give accordingly
click on save
Note :- In order to test Normal remove Custom Permission for assign Profile/Permission set
This Part you can do after flow creation and we can test when task is created whenever we created new opportunity
3 ) :- Now go to the Custom Permission App section "Custom Permission", click on that and open it.
4 ) :- Click on Edit button
5 ) :- Select the Custom Permission we created and click on save
6 ) :- Now click on Manage Assignments
7 ) :- Click on Add Assignment
8 ) :- Select the User which you want to assign, click on Next
9 ) :- Click on Assign
10) :- Click on Done
Step 3 :- Salesforce Flow - Create Salesforce Flow
1 ) :- go to the Setup, Quick Find Box, Search for Flow
2 ) :- Select for Flows then click on the New Flow Button
3 ) :- Select the Record-Triggered Flow Option, click on create and configure the flow as follows:-
Object :- Opportunity
Trigger the Flow When :- A record is created and Updated
Set Entry Criteria :- Condition Requirements :- None
Optimize the Flow for :- Action and Related Record
Trigger the Flow When :- A record is created and Updated
Set Entry Criteria :- Condition Requirements :- None
Optimize the Flow for :- Action and Related Record
4 ) :- Click on Done
5 ) :- On this screen will show and click on +icon and Select the Create Record Element
6) :- Now like this new Window will open and fill those details/select
Lable : Create Task
API name : Create_task
Description : Accordingly
How Many Records to create : One
How to set the record Fields : Use separate resources, and literal values
Create a Record of this Object : Object : Task
Map those fields as below screenshot

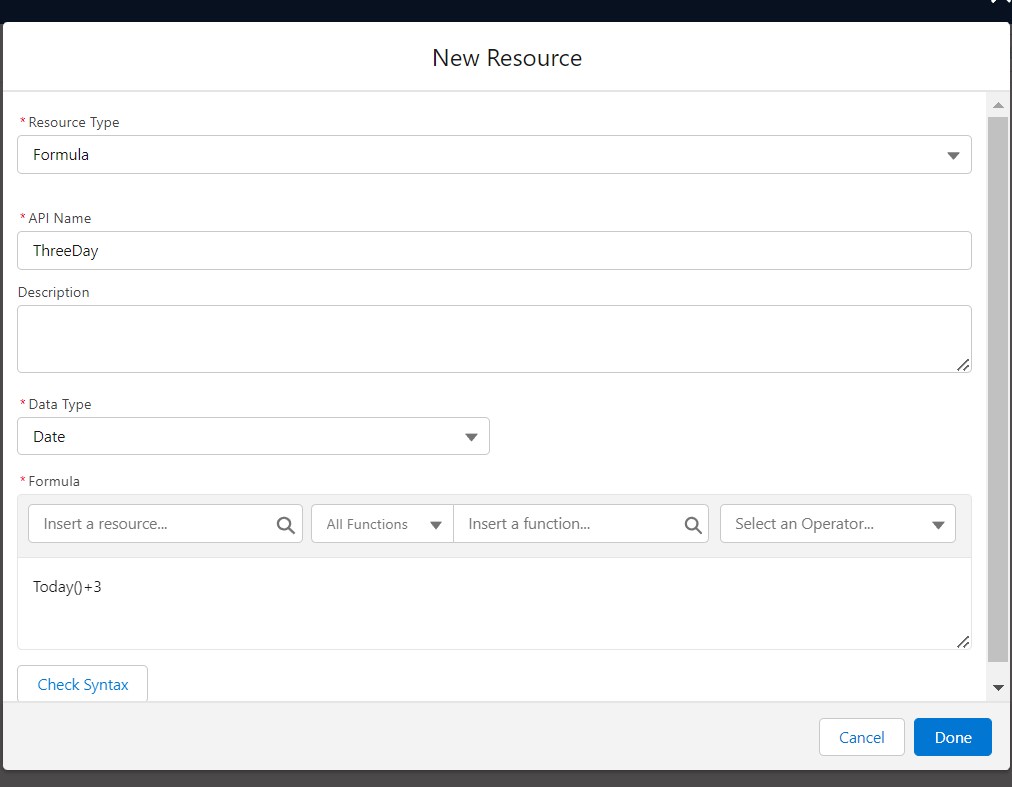
for the formula we can set this formula by creating Resource type Formula

8 ) :- Opportunity related Task is created i am creating as a Admin Profile now go back to the flow and open it open and configure the Condition like this using formula

9 ) :- Click on Done after checking Syntax, Then Save it as a new Version and Activate the Flow and again Create, Opportunity and check if task is created or not

Here we can see that no task created because custom permission is assigned the Profile